Introduction
Looking to build a high-speed RC car on a budget? Creating your own DIY RC car offers the perfect combination of creativity, fun, and ultimate performance, especially when you’re using affordable materials like PVC pipes. Whether you’re a beginner or a seasoned hobbyist, crafting a custom PVC pipe RC car will allow you to experience the thrill of racing speeds and personalized vehicle design.
In this blog post, we’ll walk you through how to build a high-speed RC car using PVC, some 3D-printed components, and quality electronics. Buckle up – let’s rev your engines and get started!
Materials You’ll Need
- PVC pipes (for frame and chassis)
- Bevel gears and 3D-printed double helical gears for drivetrain
- 3D-printed components, designed with Fusion 360
- Motor (brushless for high-performance models)
- Wheels and tires (suitable for smooth surfaces)
- Radiolink RC6GS V3 surface transmitter and receiver
- Electronic Speed Controller (ESC)
- Battery pack (LiPo recommended for speed)
- Nuts, bolts, and PVC pipe joints
Now that we have our tools ready, let’s dive into each phase of this handcrafted RC car build.
Step-by-Step Guide to Building Your DIY PVC Pipe RC Car
1. Constructing the PVC Pipe Frame
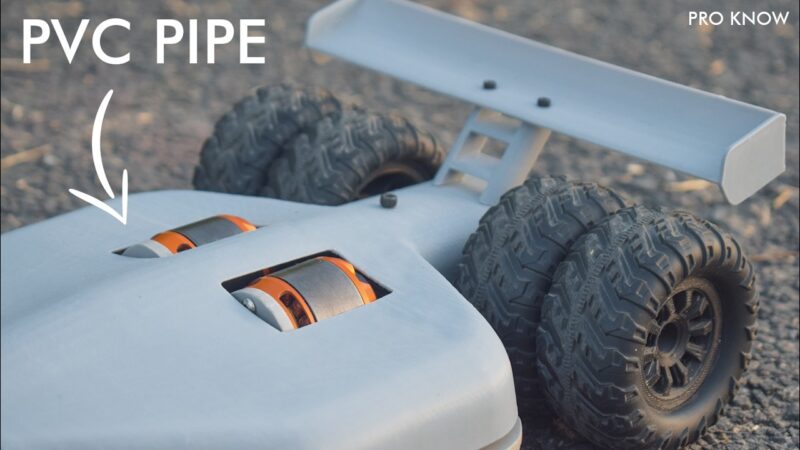
The backbone of your homemade RC car is its frame. Cut the PVC pipes to the dimensions you desire, ensuring the frame accommodates all necessary components such as the motor, gears, and electronics. PVC pipes make the car lightweight yet strong, a must-have in any high-speed RC car project.
Use PVC joints and some basic nuts and bolts to secure everything properly. Keep the design simple but sturdy – ensuring alignment is key to ultimate performance.
2. Assembling the Drivetrain
For this project, we’re going to use gears rather than the belt and pulley system. Opting for bevel gears for power transfer will give you better control and durability. To get custom specs, you can consider 3D-printed double helical gears using a service like JLCPCB. Use programs like Fusion 360 to design these parts yourself, allowing you to customize ratios and fit.
Once printed and installed, attach the motor output to your bevel gears. The PVC pipe frame should easily incorporate these components, as it allows for flexibility and in-frame mounting setups.
3. Installing the Motor and Electronics
The next step is fitting your motor and attaching it to the PVC pipe RC car. A brushless motor is best suited for high-performance RC cars, as it delivers more power and runs more efficiently. Connect your motor to a reliable battery – aim for a LiPo battery to balance power and weight considerations.
You’ll also want to incorporate an Electronic Speed Controller (ESC), which manages the power flow between the motor and battery, giving you precise control. Consider incorporating the Radiolink RC6GS V3 surface transmitter and receiver. This component ensures a long control range and built-in telemetry for better performance.
4. Wheels, Tires, and Steering System
Now that you have the frame and motor in place, it’s time to add some wheels. The wheels for your DIY RC car can be salvaged from old models or purchased separately. Make sure the tires are appropriate for smooth surfaces if you’re after speed.
Install your steering mechanism. A simple servo motor linked to the front wheels will do the trick. With a little tuning, your homemade RC car will zoom around corners effortlessly.
5. Finishing the Look with 3D-Printed Shell Cover
Finally, give your car a sleek, professional look by adding a shell cover. If you have access to a 3D printer, you can design and print a totally custom shell for your car. This step is optional but can enhance the overall appearance and even improve your car’s aerodynamics.
Don’t forget – aesthetics sometimes play a part in a car’s performance, so go ahead and get creative with the cover design!
Performance Tips for Your Handcrafted RC Car
- Ensure all gears are well-lubricated and aligned for smooth power transfer.
- Check the tightness of the PVC pipe joints – any looseness could impact performance.
- Invest in a good-quality motor and ESC, as these directly affect the speed of your RC car.
- Regularly charge and maintain your LiPo battery to ensure consistent power delivery.
- If aiming for long control distances, the Radiolink RC6GS is a great transmitter and receiver combo, providing up to 600 meters in range.
Conclusion: Racing to the Finish Line
Building your very own high-speed PVC pipe RC car is not only a fun project but also an opportunity to learn new skills in mechanics and electronics. This DIY approach allows hobbyists to take creativity to the next level, all while maximizing on-the-track performance with custom RC car designs.
By using a lightweight PVC chassis combined with efficient electronics like the Radiolink RC6GS V3, you’ll have a truly unique and resilient RC car capable of high speeds. So, gather your supplies, get building, and watch as your handcrafted RC car zips past all competition!





12 comments
dad0wd
zwh9a2
rqc7ub
v2c0uz
ksko4j
wzl3fa
mex7pe
c2pex5
iv8eb1
zjlhe4
jfpwdr
nnjiwa